Most reloaders know that cartridges should never be loaded with powder charges above the maximum or below the minimum charge weight specified in the reloading manual. However, some reloaders do not understand that excessive pressure can result even when a load is safely within the recommended charge weight range.
How is this possible? There can be a number of contributing factors. The data in the reloading manual was tested by the manufacturer to be safe using the powder, case, primer, bullet, and importantly - the firearm specified. If you change any of these parameters, the pressure developed by the cartridge will change. If you change more than one parameter, you run the risk of 'stacking' a number of slight increases in pressure that add up to an unsafe level.
Start low, work your way up, and watch for pressure signs.
The above mantra has been repeated - ad nauseum - by every reloading instructor and author since the first shooter reloaded the first cartridge, but it is still the most sound advice one can give to somebody working up a load. This article will describe some of the most common of these pressure signs.
Establish a Baseline
In order to read pressure signs from your reloads; you first need to know how a 'normal' round behaves in your gun, and what a 'normal' spent case looks like after
you shoot it. To establish what is normal, you should fire some factory ammo through your firearm - preferably with a similar weight bullet and the same
headstamps as your reloads.
While you're shooting, take note of the operation of the firearm. Try to gage the amount of recoil, and pay particular attention to extraction and ejection. For bolt or lever action rifles, take note of the force required to lift the bolt/operate the lever after firing a round. With semi-autos, get an idea of where your brass lands after ejection. With revolvers and single shot firearms, get to know the force required to eject or remove the spent cases. If you have a chronograph, record the velocity of the rounds.
Retrieve your spent cases and note the condition of the primer, the shape and characteristics of the firing pin impression left on the primer, take note of any marks or impressions on the case head, and inspect the condition of the rims on cases.
It is a good idea to clearly mark and retain at least one fired factory case from each manufacturer. This will allow you to better compare the condition of the fired brass from your reloads with fired factory brass - without having to rely on your memory.
Now that you have your benchmark, you're ready to look for pressure signs. Keep in mind that there are no absolutes when it comes to pressure signs. There are exceptions to every rule, and some calibers/firearms may exhibit no pressure signs until catastrophic case failure. Often times, something that looks like a pressure sign can be caused by excessive headspace, or by a problem with the firearm. If you suspect excessive pressure, stop firing until you determine what is wrong.
Keep in mind that there are no absolutes when it comes to pressure signs. There are exceptions to every rule, and some calibers/firearms may exhibit no pressure signs until catastrophic case failure.
Excessive Recoil
Sometimes, the first noticeable indication of a pressure problem with your reloads is excessive recoil. If the bullet weights are similar, and the recoil is
noticeably greater with your reloads vs. factory ammo, it is possible that you're pushing the envelope. Keep in mind however, that recoil is the least
reliable indicator of over-pressure.
Recoil is subjective, and you may be paying closer attention when firing your reloads, causing them to seem stronger when they're not. Bullet weight contributes more to felt recoil than pressure, so if your reloads have heavier bullets than your benchmark rounds, heavier recoil should be expected. Also, if your benchmark factory rounds were inexpensive 'bulk-pack' handgun ammo (which is often loaded notoriously light), a bit more recoil from your handloads is probably normal.
Hard Extraction
Unlike recoil, extraction and ejection problems are very reliable indicators of excessive pressure. When a cartridge is fired, the case expands to
seal the chamber. Excessive pressure causes excessive expansion, which causes difficult extraction. Harder-than-normal bolt lift on a bolt-action
rifle or sticky lever operation on a lever gun are classic signs of over-pressure.
A change in the way that cases eject or failures-to-eject can indicate excessive pressure in semi-auto firearms. The same signs can also indicate lower than normal pressure in a semi-auto, so you'll need to look for additional pressure signs or use a chronograph and let the velocity tell you whether the pressure is too high or too low. Harder than normal extraction from a clean revolver or single-shot firearm is also a good indicator of excessive pressure.
Flattened Primers
A flattened primer is the most widely known pressure sign. Unfortunately, it is also one of the least reliable pressure indicators. When new,
the bottom edge of a primer cup is slightly rounded. This creates a small bevel between the bottom of the primer and primer pocket. When the
round is fired, the primer slams into the breech face and flattens out. The theory on flattened primers is that if the pressure is excessive, the
primer will 'flow' into the bevel, with the round edges of the cup becoming squared off when the primer fills the open space.
The amount of flattening is going to vary according to the firearm and the brand of primer, so taken by itself, a flattened primer will tell you little about the pressure. This is where you need your benchmark rounds. Compare the condition of the fired primers on your reloads to those on the benchmark cases. If the reloads are significantly flatter, it's possible that the pressure is too high.
The photo below shows three different .357 Magnum rounds fired from the same revolver. The round on the left was a low-velocity 'powder puff” load. The CCI primer shows almost no flattening whatsoever. The round in the center is a full power load with a Federal primer. Although the primer has flattened out some, this is perfectly normal for this particular revolver. Although many 'experts' would say that this primer is 'too flat' and indicates high pressure, it is virtually identical to a fired case from a round of Federal factory ammo.
The case on the right shows a severely flattened primer that clearly indicates an over-pressure condition. Also notice that the firing pin impression gets progressively shallower when the pressure goes up. This is because the pressure is partially 'popping out the dent'.
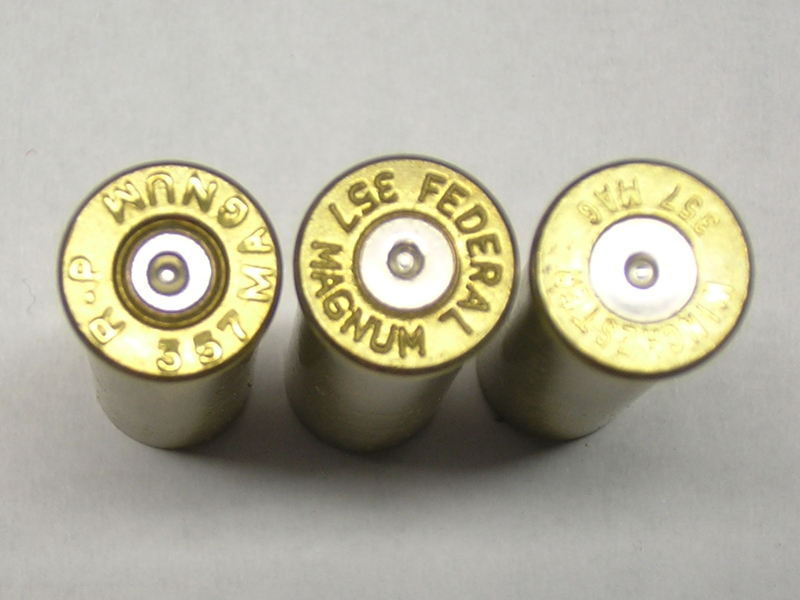
Often, a flattened primer indicates excessive headspace rather than high pressure. If a cartridge fits loosely in the chamber, the primer will flatten out when the case head slams back against the breech face during firing. This can happen even with low pressure loads. The primer brand can also have an effect on the amount of flattening. Federal primers are soft, and will flatten more than other brands with everything else being the same.
Extruded Primers
An extruded or 'cratered' primer occurs when material from the primer cup is forced back into the firing pin hole in the breech face during firing.
Usually, this is caused by a loose fit between the firing pin and the opening. If this is the case, your benchmark rounds will show some degree of cratering.
If no trace of extrusion exists on your factory rounds, but your reloads exhibit it, it can be indicative of excessive pressure.
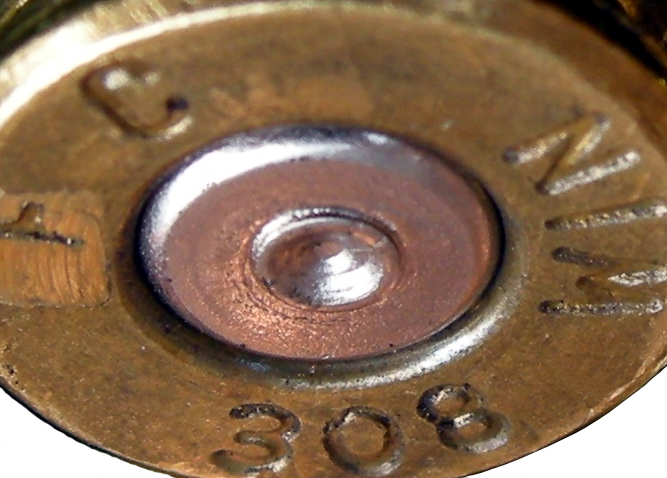
The primer in the photo above is from a neck-sized .308 reload with a maximum powder charge. A normal round from this rifle shows no cratering at all, so the extruded primer is a good indicator of over-pressure. Notice that because of the tight headspace of the neck-sized round, there is very little flattening of the primer. The rifle's bolt was hard to lift after firing this round – further indication that it's time to back off.
Pierced Primers
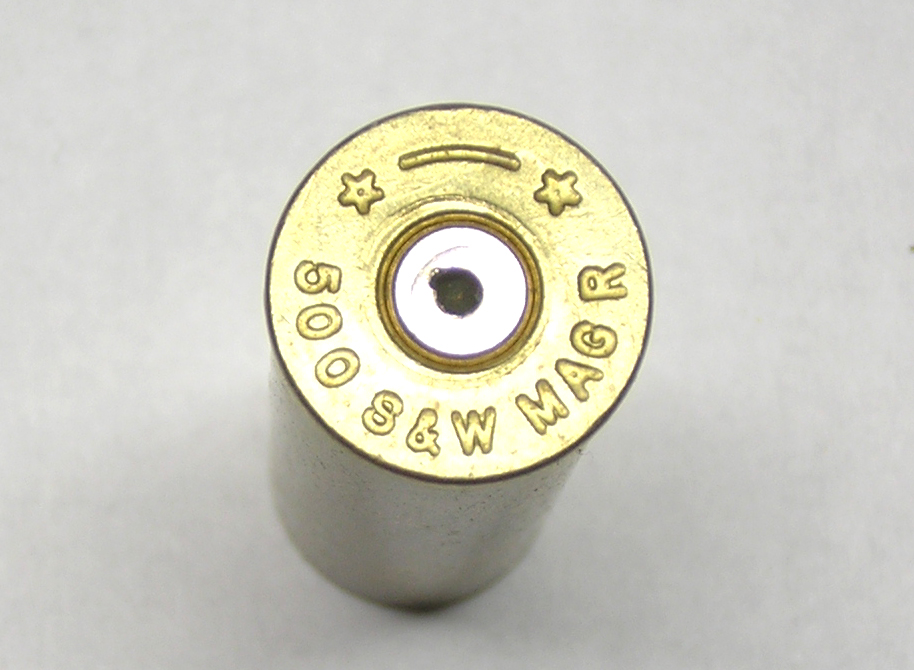
If your firearm is in good condition, you should never see a pierced primer on a fired case. This pressure sign in particular is unmistakable:
If the primer is pierced where the firing pin hit it, the pressure was too high. If you experience a pierced primer, stop firing the rounds immediately.
This problem is more than a minor inconvenience; it can cause serious damage to the firearm. When a primer blows out, a high pressure jet of super-heated
gas blasts out of the hole. This can cause erosion of the firing pin, breech face, or any other part of the gun that gets in the way.
After piercing a primer, you should have your firearm inspected by a qualified gunsmith before firing it again with any kind of ammo.
Missing Primers
There are two possible causes for missing primers on your spent cases: Loose primer pockets or higher-than-normal pressure. If your brass is from a
high-pressure cartridge (like .38 Super or .223/5.56) and it has been reloaded several times, then chances are good that the primer pockets have loosened up,
and it's time to retire the cases. If the brass is new or once-fired, a missing primer can be an indicator of over-pressure, and will often be
accompanied by additional pressure signs. The photo below shows a once-fired 9mm case that was loaded to an overall length that was too long for
the bullet/chamber combination. The bullet was pressed into the lands when it chambered, resulting in excessive pressure upon firing.
In addition to the missing primer, the case features another telltale sign of over-pressure that is described later in this article.

Sooty Ring Around the Primer
Although it is often listed as a pressure sign, this one is probably the least reliable. An obvious sooty discharge emanating outward from around the perimeter
of the primer is a sign of gas leakage. More often than not, the leakage is caused by a stretched out primer pocket. The easy way to tell is to decap the
case with a universal decapping die. If the primer pops out more easily than on a 'normal' case, you've found your problem. A universal decapping die
should be used instead of the sizing die because it will allow you to better feel the force required to pop out the primer. If you don't have a universal decapping die,
you can use the sizing die for a larger caliber cartridge.
One more thing: I underlined the word 'obvious' above because when this condition exists, the leakage is as plain as day and will look much different than a normal spent case. A little bit of crud left in the beveled recess between the primer and the case head is probably a better indicator of a filthy gun than it is gas leakage.
Case Head Extrusion
When a cartridge is fired, the breech face supports the case head. With the exception of break-action and some single shot firearms, the breech face does not
totally cover the case head – there's a cut-out in the breech for the extractor. Excessive pressure can cause brass from the case head to extrude into the
extractor recess in the breech, leaving a raised bump on the case head in the shape of the extractor cutout.
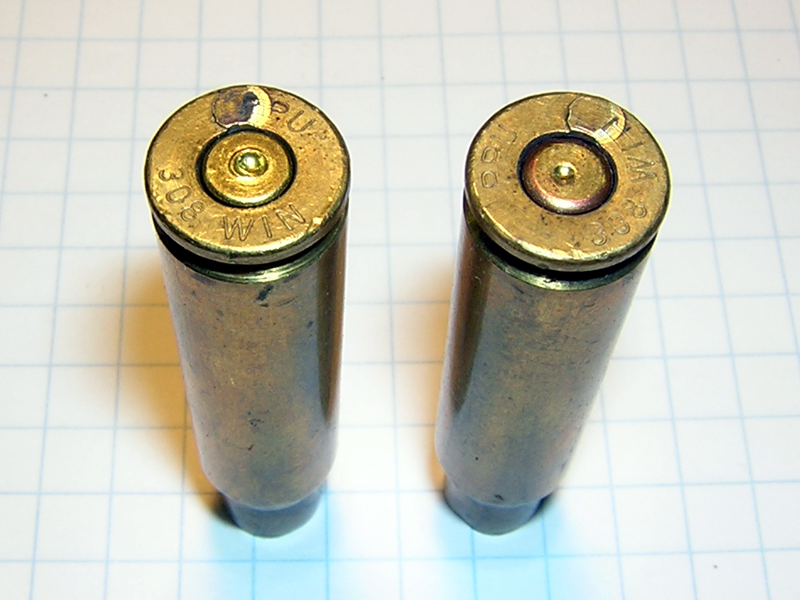
If this extrusion does not show up on your factory 'test' rounds, but is present on your reloads, it is a very reliable indicator of over-pressure. Keep in mind that all brass is not created equal, and some brass cases (especially Federal) are softer than others. It is not uncommon to see a trace of the extractor recess impressed into the case head of factory Federal rounds, but a prominent extrusion that will catch your thumbnail is always a sign that there is something very wrong.
Bent Rims
Earlier in this article the various extraction/ejection problems associated with over-pressure in a semi-auto were described. The reason for the
ejection problems it that excessive pressure can cause the case to over-expand and grip the chamber walls much tighter than normal. When this occurs,
the force necessary to extract the spent cartridge from the chamber increases.
In addition to causing extraction problems, this increase in force can cause the extractor to bend the rim of the case. A rough finish inside the chamber (or other problem with the firearm) can also cause bent rims; so you should retest with some factory ammo to rule this out.
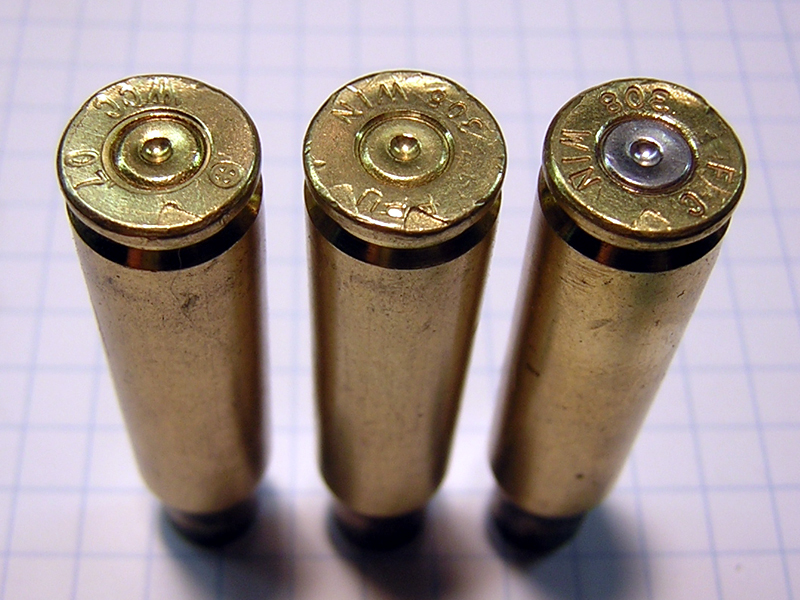
The photo above shows bent rims on some .308 cases caused by excessive pressure. Also note that there is a slight extrusion mark on the case head from the ejector. Neither of these conditions exists when factory ammo is used, so they are good indicators of excessive pressure.
Unusual Velocity
The chronograph is a very useful tool for diagnosing pressure problems. In fact, a chrono can tell you that a pressure problem exists even if the
rounds exhibit no visible signs. Before firing your reloads, it's a good idea to consult several reloading manuals to get a general idea of the
velocity to expect. Be sure to take into account the firearm used by the manual's publisher for testing. For example, if the reloading manual
states that the .357 magnum cartridges were tested in a universal (closed breech) receiver and a 10” barrel, you should not expect to match the velocity with
your 4” revolver. If you do reach the stated velocity even though you have a shorter barrel and a pressure-relieving cylinder gap, you're probably running too hot.
Use the chronograph to measure the velocity of your rounds as you work up a load. An increase in the powder charge should increase the pressure; and an increase in pressure should cause an increase in velocity. If it does not, it can indicate that some dimension inside the case or the firearm is stretching when the rounds are fired. If you increase the powder charge and do not see an increase in velocity (or worse yet, see a drop in velocity), you should stop immediately and find out what is wrong.
Final Thoughts
As you've probably figured out by now, reading pressure signs is part art, and part science. Many of the conditions described in this article can be caused by
factors other than excessive pressure. You've probably also noticed that excessive pressure often results in more than one of the signs being exhibited.
Any time you suspect higher than normal pressure, it is prudent to back off and reassess. The rule is, as always: Start low, work your way up, watch for pressure signs,
and never exceed the charge weights listed in the manual.