Resizing (also known simply as 'sizing') is perhaps the most important step in case preparation. Returning the case to its original factory dimensions (or the correct dimensions for your firearm) allows you to make ammunition that is reliable, safe, and accurate. Failure to do it properly can result in feeding problems, reduced brass life, inaccurate ammo, and/or catastrophic failure of the case. This article describes how to properly set up full length sizing dies for straight and tapered cases. Setting up the sizing die for a bottle neck case is a bit more complicated
Die Design (Carbide vs. Steel)
The dies for reloading straight or tapered cases come in three-die sets - typically consisting of a sizing/decapping die, an expander die, and a seating/crimping
die. I'm actually going to cover two of the three dies in this article because I consider expansion part of the resizing process. You'll see why later.
You can buy either all steel dies, or carbide dies. Steel dies are less expensive, but will require you to lube the cases before sizing. With carbide dies, no lube is required for most straight and tapered pistol cases. Please note that bottleneck cases require lube even when using carbide dies, and case lube will make it easier to resize long straight cases (such as the 45-70, S&W 500 Magnum, 357 Maximum, etc), but carbide dies will save you the steps of lubing and removing the lube from most pistol and revolver cases. They are well worth the extra money.
Just to clarify, carbide dies are not made of solid carbide. In fact, the expander and seating/crimping dies in a carbide die set are the same as those in a steel die set. The only die with any carbide in it at all is the sizing die, and the carbide portion consists only of a small ring pressed into the mouth of the die (see Figure 1).
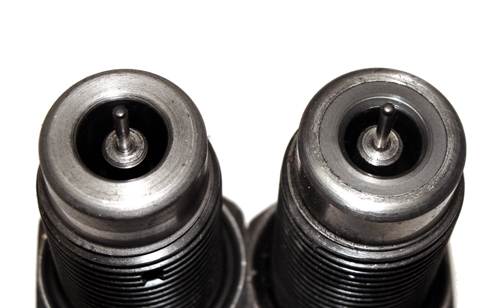
The carbide insert in the die on the right enables you to size cases without applying case lubricant Carbide is harder, smoother, and more abrasion-resistant than steel. It is also much more brittle. When using a carbide sizing die, it is extremely important to set the height of the die so that there is a small amount of clearance between the shell holder and the die. Otherwise the force of the shell holder repeatedly impacting the die can cause the carbide ring to crack, which will completely ruin the die.
Press Design
There's a fine point of single-stage press design that must be understood before attempting to set up your sizing dies. Some presses are designed to "cam over"
and some are not. If a press cams over, its ram reaches its highest point before the handle reaches its stop. In other words, the ram goes up as you
lower the handle, reaches its highest point before the end of the handle travel, and then moves back down slightly as the handle reaches its hard stop. An
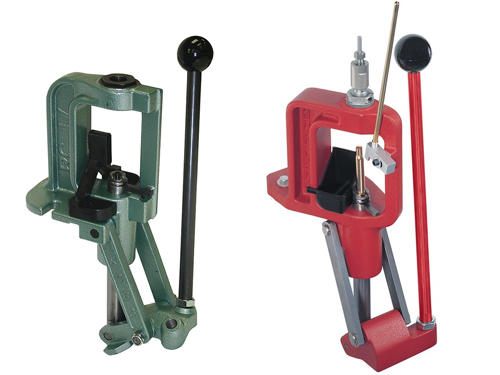
example of a single stage press that cams over is the Hornady L-N-L Classic.
If a press is designed not to cam over, its ram will reach the highest point when the handle is fully lowered and against its stop. The RCBS Rockchucker is an example of a press that does not cam over. The easiest way to determine whether or not your press cams over is to run the ram all the way up (lower the handle as far as it will go), screw in any die, then try to lift the handle to lower the ram. If the handle lifts with no resistance, then your press is a non-cam over design. If you encounter resistance when you lift the handle, and the resistance disappears when you back out the die, then your press cams over. Whether or not the press cams over has an effect on the way you set up your sizing dies - especially when using carbide dies.
Setting Up the Sizing Die
Generally speaking, the instructions that accompany the dies for straight and tapered cases are spot-on and should be followed to the letter. Unfortunately,
many reloaders either don't read them, or chose on their own to do things differently. The concept is simple: With straight and tapered cases, the sizing
die should be set low enough to size as much of the case as possible.
Setup is easy with a press that doesn't cam over: Install the proper shell holder in the ram, lower the handle to raise the ram all the way, and screw in the die until it touches the shell holder. If you're using an all steel sizing die, you're done - lock the die in place with the locking nut/ring. If you're using a carbide sizing die, back the die out a quarter turn after it contacts the shell holder to prevent the shell holder from contacting (and potentially damaging) the carbide ring at the mouth of the die. Run the ram up and down several times to ensure that there is no contact between the die and shell holder.
Setup is a little trickier when your press cams over: Install the proper shell holder in the ram, lower the handle to raise the ram all the way, and screw in the die until it touches the shell holder. Begin slowly backing out the die until you're able to move the handle. If you're using an all steel sizing die, keep backing out the die until you can just barely feel the shell holder contact the die when the ram moves through its highest point. Lock the die in place and operate the handle through the full cycle several times. You should feel only the slightest resistance as the shell holder cams over the top and touches the die. If the shell holder cams over with too much force you will add no positive benefit to the sizing process, and run the risk of eventually deforming the bottom of the sizing die.
If you're using a carbide sizing die, keep backing out the die just until there is no contact between the shell holder and die as the ram moves through its highest point. It helps to keep one hand on the sizing die during this process to feel the contact as you move the ram back and forth through the top. As soon as the shell holder stops contacting the die, lock the die in place. Raise and lower the handle several times to ensure that there is no contact between the die and shell holder. To test that the die is low enough, place a dollar bill on the edge of the shell holder and run the ram through its highest point. You should feel the dollar bill 'grab' when the shell holder-to-die distance is at the minimum. If not, readjust your clearance.
As a timesaver for future setups, use a permanent marker to put a witness mark on your die at the 6:00 position after you've got it adjusted. When you need to re-install the die in the future, realigning the mark will get the die very close to where it needs to be.
Why is Proper Setup Important?
Regardless of caliber or case type, a resizing die cannot resize the entire case. Every resizing die features some amount of radius or chamfer on the bottom
that enables easier feeding of the case into the die (see Figure 1 above), and every shell holder has some thickness of material above the rim of the case.
Because of these factors, there is a portion of the case just above the rim that is not touched by the resizing die - even when the shell holder firmly contacts the die.
This is normal and does not affect the reloading process because the portion of the case that is untouched by the resizing die is part of the web. The brass is
thicker in this area of the case, and does not expand during firing as long as the pressure is below SAAMI maximum for the cartridge.
Problems can arise when you set the resizing die too high and fail to resize the entire expanded portion of the case. I once received some many-times-fired 38 Special
brass from a long time reloader. He would purposely set the sizing die to resize only the top portion of the case to (in his words), "Save wear and tear on the cases".
One of these cases is shown on the left in Figure 2 next to a many-times-fired but properly resized case.
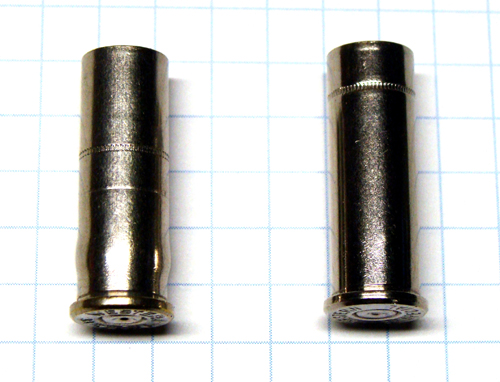
Notice the prominent bulge near the bottom of the improperly resized case. This bulge developed because of repeated incomplete resizings of the case. Running the already-bulged cases though a properly set resizing die does not fix the problem; it actually makes it worse. Instead of removing the bulge, it pushes it farther down the case and expands it to the point where some of the cases will not even chamber.
With tapered cases such as 9mm, incomplete sizing manifests itself in a much more insidious and dangerous manner. Since the case is tapered, most of the resizing occurs at the very end of the sizing cycle when the case is fully inserted into the die. Failure to fully insert the case (by setting the die too high) can result in case mouths that are not reduced in diameter enough to provide sufficient hold on the bullet. Bullets inserted into these cases can be easily set back (pushed into the case). Dangerous pressures can result if setback occurs when the bullet hits the loading ramp of your barrel. You can check for this condition using the 'bench test'. Take a loaded cartridge, measure the overall length, then push it (by hand) firmly into your reloading bench bullet first, and measure it again. If the second measurement is smaller than the first, you're getting setback and you should double-check your sizing die setup.
The Role of the Expander Die
There is one final sizing step required to prepare the case for loading: Expansion. Many reloaders think that the sole function of the expander (sometimes called the
"belling") die is to flare the mouth of the case so that it is easier to seat the bullets. While the expander die does perform this important function, it has an
additional and equally important role in the process: It completes the resizing step.
When a batch of cases has been run through the sizing die, every case in the batch will have identical outside dimensions. However, the inside is a different story. The thickness of the brass cases from different manufacturers (and even different lots from the same manufacturer) will vary slightly - up to 0.006" from one extreme to the other. To ensure that even the thinnest cases will sufficiently hold the bullets, the reloading die manufacturers purposely design the sizing dies to undersize the cases.
In other words, ALL of your freshly-sized cases are undersized. The cases with the thickest walls can have an inside diameter (which is the important dimension) up to 0.016" smaller than the bullet diameter, and up to 0.012" smaller than the cases with the thinnest walls. If you simply flared the mouth and stuffed in a bullet, the resulting ammo would be terribly inconsistent. For your ammo to be consistent, the inside diameters of the cases needs to be made uniform, and sized properly to the bullet. The expander die takes care of this.
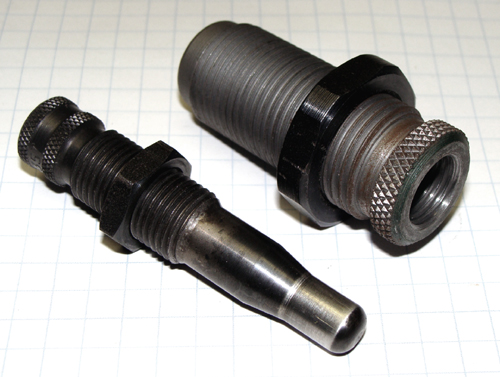
The expander die features a caliber-specific expander 'mandrel' that is inserted into the case to a depth slightly deeper than the bullet length (see the Figure 3) . The mandrel expands the inside diameter of the top part of the sized case so that it is 0.002" to 0.003" smaller than the nominal bullet diameter, which provides the ideal amount of 'hold' on the bullet when it is seated into the case. The expander mandrel features a belling shoulder that will flare the very top of the case mouth - completing the preparation and making the case ready for priming, charging, and bullet seating.